BlueJ

Useful Configuration Options and Lab Setup
last modified 01.27.07
(back to www.apcomputerscience.com)
Ok,
do these in order. These steps will enable you to get all files you'll
need to write programs in Java and use BlueJ to do so.
1. Download and install Sun's Java  (note:
I'm now using Java 5 - and you should be, too, if you're in AP. I don't
want to change all the folder names within this tutorial so my examples
will use 1.4.2. If you are installing Java 5, note where it gets installed.
By default, it should be in 'Java' within 'Program Files' on your c:) (note:
I'm now using Java 5 - and you should be, too, if you're in AP. I don't
want to change all the folder names within this tutorial so my examples
will use 1.4.2. If you are installing Java 5, note where it gets installed.
By default, it should be in 'Java' within 'Program Files' on your c:)
2. Download and install BlueJ
3. Create a folder on your hard drive that you won't move (I'll
use c:\javaStuff for all
of my examples).
4. Unzip this zip file of jars
right into the c:\javaStuff
folder. You'll now have a c:\javaStuff\myJars
folder with all the jars in it. What's
in the jars zip? What is zip?
5. Unzip this zip file of api's
right into the c:\javaStuff
folder. You'll now have a c:\javaStuff\myAPIs
folder with all the APIs in it. What's
in the api's zip?
6. Optional, but highly recommended (otherwise BlueJ
will go to the internet each time you need the APIs) - go to http://java.sun.com/docs/
and get Sun's API
to put on your local hard drive. Unzip it into the folder that
was created on your hard drive as a result of doing
step 1(it's called something like c:\j2sdk1.4.2_04).
It'll create a docs folder.
Here is what your hard drive now looks like:

Ok, physically, your computer has what it needs.
BlueJ will now run. In order to use your own jar files you'll have to
enable BlueJ to see them.
There are different ways to do that; I will only give you what I believe
is the easist way.
BlueJ works on a folder system; everything that is part of one project
must be in a single folder (that's a good thing).
If you have any jars that the project needs, just create a "+libs"
folder within the project folder and put any jars you need in it.
So, for an MBS project, it would look like this:

Starting
your students on a new project each time
If you just create a project with all files needed for it and then place
it on a network drive, your students could
just copy it into their account and begin. Here are 3 projects with the
generic setup that I use:
Karel
Folder with which to begin a project
MBS
Folder with which to begin a project
MBS
Folder with which to begin a project (dynamic population)
Opening
BlueJ Projects
1) project  open project...
Opening
Non-BlueJ Projects
1) project
open non-BlueJ...
2) click on folder that contains your project files (don't go into the
folder, just select it)
3) click on "open in BlueJ"
note: from now on, it's a BlueJ project (you'll see some other files in
your folder now - they're for BlueJ).
When you go to open this project the next time, just do a normal "open
project..."
Editing the
.tmpl files
The .tmpl
files control what a default class, interface, abstract class, etc. will
look like when you choose "New Class".
Just go to the "newclass" folder within the BlueJ install folder.
Here is where it's at:
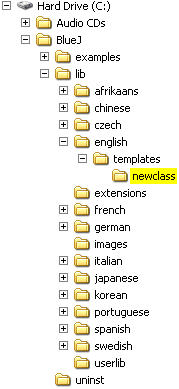
You'll see some .tmpl
files. They are just text files. You can open them and edit as you wish.
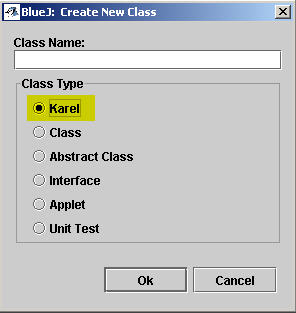
Here are 2 that you can use that
I just add to the newclass folder:
Karel.tmpl and newclass.tmpl If you add these,
you'll see this when starting a new class within the environment:
Editing
the bluej.defs file
The bluej.defs file is
a text file. It controls the default settings for many things in BlueJ.
Open it, read the comments, then edit what you will. I edit the section
that controls what options are listed under the "Help" menu.
My bluej.defs
file (you can replace the installed one with it - if you kept to my exact
folder structure above, you won't need to edit this version I created
- see pic below for exactly what I've edited in the file). If you placed
the APIs where I suggested above and you replaced the bluej.defs
file with mine, you'll be able to open the APIs directly from within BlueJ(see
the BlueJ Help menu graphic below)
Here is where the bluej.defs
file is located:

Here is the part of the bluej.defs
file that I edited:

#Here is the code so you can COPY it (thanks, Mike!)
bluej.help.items=karel
chnutil MBS
bluej.help.karel.label=Karel
bluej.help.karel.url=c:/javaStuff/KJRdocs/index.html
bluej.help.chnutil.label=chnutil
bluej.help.chnutil.url=c:/javaStuff/chn_util/chndocs/index.html
bluej.help.MBS.label=MBS
bluej.help.MBS.url=c:/javaStuff/javaMBS/index.html
If you edit the file as above, you'll see this show up in BlueJ:

Setting BlueJ
to use a local copy of Sun's API instead of going out to the internet
By default, BlueJ will go out to the internet each time
when you select "Java Class Libraries" from the
Help menu:

This is fine if you have a fast connection and your lab
is always connected (don't I wish).
Change it so that BlueJ uses the local copy of the API (if you took the
suggestion
and did step 6 at the top of this page). Just go to
Tools
Preferences...
Miscellaneous
and change the URL to the location of the index.html file for the API.

What's
in the jars zip?
mbsbb.jar, mbsgui.jar, KarelTheRobot.jar, objectdraw.jar
What's
in the api's zip?
The APIs for MBS and Karel J. Robot
Objectdraw
with BlueJ?
(see http://applecore.cs.williams.edu/~cs134/eof/library/readmes/objectdraw4BlueJ.pdf
for details)
What
is zip?
You can read about zipping/unzipping and get a free evaluation of WinZip

|